Setting Up Two-Factor Authentication (2FA) for Apple ID
Want to set up Two-Factor Authentication on your Apple ID account? Here's everything you need to know!
Updated: February 15th, 2023

Introduction
No doubt, Apple devices are among the safest and most secure mobile devices today. However, taking some precautions when using your Apple device is still essential, especially for sensitive tasks such as online banking or other financial transactions is still essential.
Two-factor authentication (2FA) requires users to enter two different codes to access their accounts on websites and apps. This prevents hackers from accessing your account without passwords and another code. 2FA is especially useful if you use the same username and password for multiple services.
Two-factor authentication for Apple ID ensures that only you have access to your Apple ID by requiring you to provide an additional verification step when logging in. That way, someone else can’t access your account even if they know the password. But how does it work, and how do you set it up and manage your account? This comprehensive blog post will guide you through all these steps so you can start immediately. We’ll also answer a few questions that we suspect will be atop your mind after reading the blog.
How Does Two-Factor Authentication Work?
When you first sign up for an Apple service, you’ll be asked to create a unique Apple ID. Your Apple ID is like your email address; it helps identify you across all your Apple products and services. You can think of it as your digital fingerprint. The Apple ID is tied to your iCloud account, which stores information about purchases, photos, documents, calendars, contacts, reminders, and more.
When you need to change your Apple ID settings, you’ll be prompted to authenticate yourself with a Touch ID or a passcode. If you choose to use Touch ID, you’ll see a prompt appear on your iPhone asking you to verify your identity. To confirm, simply place your finger on the Home button.
If you select to use a passcode instead, you’ll receive a text message containing a six-digit number. You’ll need to type this number into the appropriate field on the website where you want to change your Apple ID settings. And another thing, when accessing your account on the web, you can decide to trust your browser. That way, you won’t need to repeat the verification process every time you sign in from that computer.
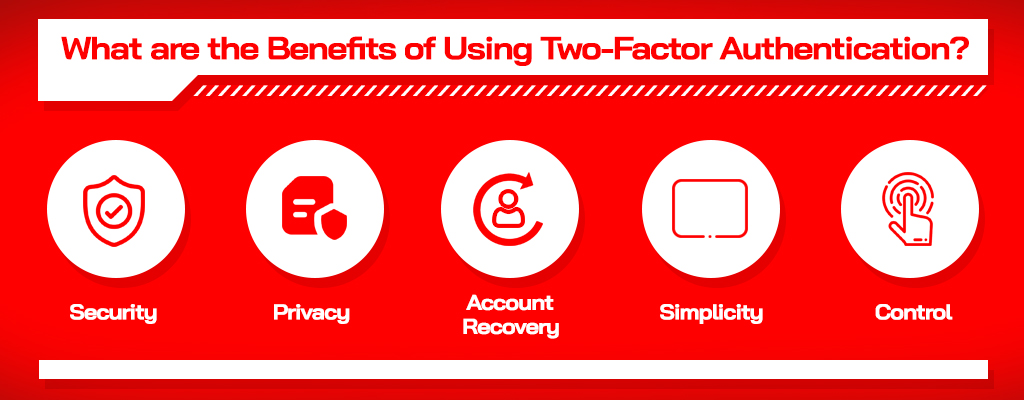
What are the Benefits of Using Two-Factor Authentication?
There are several benefits to using two-factor authentication for Apple ID:
- Security – When logged in to your account, your Apple ID is protected against unauthorized access. Hackers would need your password and the second factor—a code sent to your phone via text message or generated by your trusted device—to access your account.
- Privacy – With two-factor authentication enabled, no one except you can access your account unless they have both your password and the second verification method.
- Account Recovery – If you forget your password, you can recover your account by entering your Apple ID and the second factor.
- Simplicity – Since you don’t need to remember any passwords, you can easily switch between devices and computers.
- Control – You can control what happens to your data when you delete your account. For example, you can turn off the automatic backup of your calendar events, contacts, notes, reminders, and other items stored in iCloud.
Setting Up Two-Factor Auth for Apple ID
Please follow the steps below to enable two-factor authentication for your Apple ID. We’ve divided them into three sections, detailing how to set up 2FA on your iPhone/iPod/iPad, Mac, and the Web:
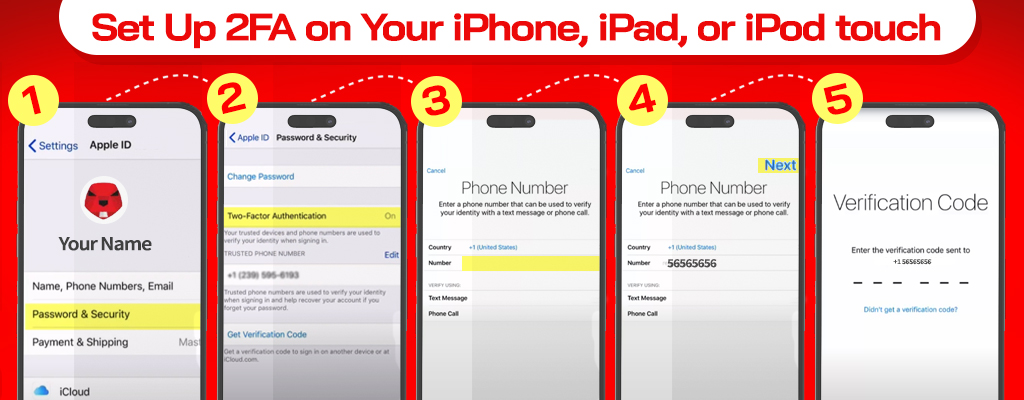
Set Up 2FA on Your iPhone, iPad, or iPod touch
Turning on 2FA on your iPhone, iPad, or iPod touch has never been easier. You simply need to:
- Go to Settings > [your name] > Password & Security
- Tap the Turn On Two-Factor Authentication button, then press Continue
- Enter your primary phone number for receiving verification texts once you sign in. You can choose to receive automated phone calls or verified text messages.
- Tap Next
- Enter the verification code sent to your phone to verify your number and enable 2FA
Set Up 2FA on Your Mac
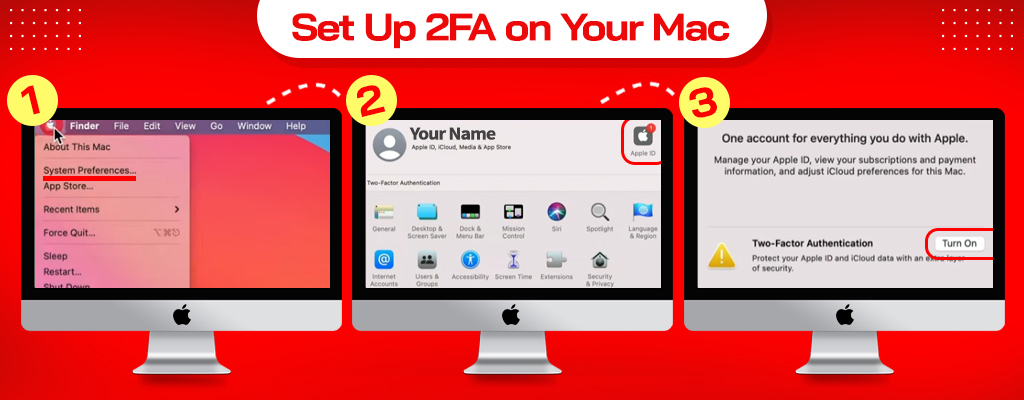
In three simple steps, you can also set up 2FA on macOS Mojave (10.14) and later versions. Here’s how:
- Go to Apple menu > System Preferences, and click Apple ID
- Press the Password & Security button underneath your name
- You’ll notice that the Two-Factor Authentication feature is Off; Turn it On
Upgrade to 2FA on the Web
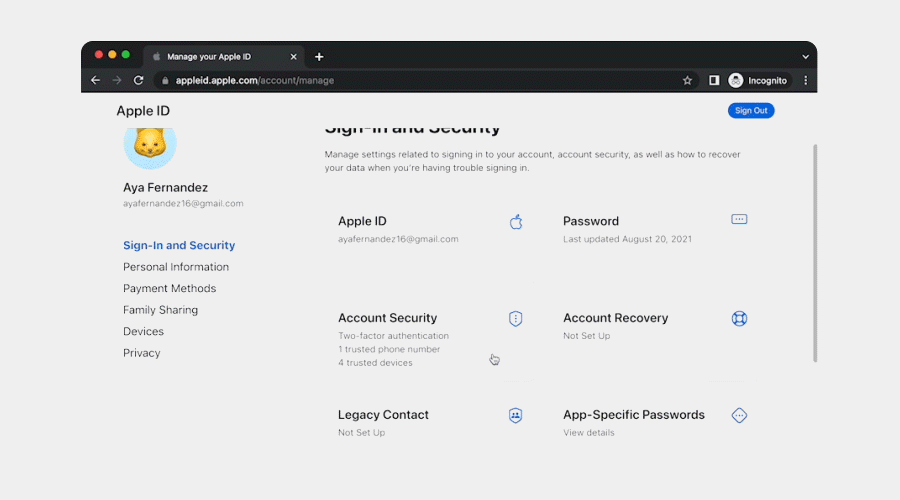
If you prefer to access your account through a browser, you can also upgrade to 2FA on the web. To do so, please follow these steps:
- Open appleid.apple.com and sign in with your Apple ID
- Answer security questions, if any, then tap Continue
- You’ll notice a pop-up to upgrade your account security; tap Continue
- Go to Upgrade Account Security
- Enter your primary phone number for receiving verification texts once you sign in. You can choose to receive automated phone calls or verified text messages.
- Click Continue
- Enter the verification code sent to your phone to verify your number and enable 2FA
Managing Your Apple ID Account
Once you’ve turned on 2FA for your Apple ID, you may want to manage your trusted devices, phone numbers, and other crucial account information.
Manage Your Trusted Phone Numbers
You need at least one trusted phone number to use 2FA. But, there’s no harm in verifying a different number to provide an extra safety net in case your phone gets damaged or goes missing.
Here’s how to add a trusted phone number to your Apple ID page:
- Go to appleid.apple.com and sign in with your Apple ID
- Proceed to the Security section and click Edit
- Click Add a Phone Number and enter your additional phone number
- Verify the phone number and enable 2FA by providing the code sent to your device
Manage Your Trusted Devices
Viewing and managing your trusted devices is also possible in a few steps. You can do so on your iOS, macOS, or the Devices section on your Apple ID account page.
On iOS:
- Click Settings > [your name]
- Choose a device from the list
On the web:
- Click the Apple ID account page and sign in with your Apple ID
- Proceed to the Devices section
On macOS Mojave or earlier:
- Go to Apple menu > System Preferences
- Proceed to iCloud, then Account Details
- Click the Devices tab and select a device from the list
On macOS Catalina or later:
- Go to Apple menu > System Preferences
- Select Apple ID and sign in
- Choose a device from the list
Frequently Asked Questions
Now that you know how to set up and manage two-factor authentication with your Apple ID, here are some frequently asked questions about this process.
What happens when I turn on 2FA?
When you turn on 2FA, you will receive a verification code via SMS text message. This code must be entered into the app on your mobile device before logging in to your account. If you lose your phone, you won’t be able to log in until you get a new SIM card.
Why does my phone keep asking me to verify my phone number?
When setting up 2FA, you were prompted to verify your phone number. This was done because you needed access to your phone number to receive verification codes. Now that you’re using 2FA, you don’t need to verify your phone number anymore. However, if you ever change your phone number, you must re-verify it.
Can I disable 2FA?
Yes, though not recommended! To disable 2FA, go to the Security section on your Apple ID page and uncheck Enable 2 Factor Authentication. Once disabled, you’ll still be able to log in to your account, but without any added security.
- Guidance for Your Next Retail Repair Shop - October 1, 2025
- Minneapolis Store Update – Effective October 1, 2025 - September 1, 2025
- Repair Challenges: Understanding Our Service Decisions - February 19, 2024